Table of Contents:
During a residential Category 1 water intrusion, water flows under cabinets and wicks into the wall assembly behind them. In a commercial Category 1 water intrusion, water flows across the floor into a metal framed, insulated wall assembly covered with gypsum board and ceramic tile. In both projects the restorer is faced with a crossroad, dry in place or demo to open these assemblies. Traditionally, in the residential example we would see the restorer remove the cabinets, cut open the wall and dry the assembly behind. In the commercial example, we would see most restorers remove the tile and dry the open assembly. This achieves the objective of getting the building dry, and on some projects will be the correct answer. Since this demo heavy strategy is successful in drying the building, why consider adjusting your water mitigation process? I can think of at least two reasons.
Challenges When Mitigating Projects- Drying Behind Cabinets


Rising construction costs and limited availability of resources are strong motivation to look for more refined and creative approaches to drying. Due to elevated costs, drying more materials in place for longer periods of time has become a very cost-effective approach, while increasing profitability for mitigation contractors. Additionally, availability of materials and qualified labor is becoming more strained. It is reasonable to conclude that this trend will continue to intensify. Adjusting your water mitigation process now will put professional restorers on a firm footing. What adjustments can be made?
As with drying any assembly, it is not the inability to dry the air or warm the water in the assembly that creates the challenge. The solution lies in getting airflow to the water and allowing resulting vapor to escape. When drying cabinets, drill holes to inject air flow under the cabinets and then also into the wall assembly behind the cabinets. Setting screws so that they can reach the wet materials behind will ensure that all areas are dried thoroughly.
In some cases, it may be necessary to completely remove the floor and back wall of cabinets that will ultimately be replaced to remove moldy materials prior to drying. If entire cabinets must be removed to address contamination issues, install temporary shoring under the countertops where cabinets must be removed and leave other cabinets in place. This allows the kitchen to be used after remediation and drying until new cabinets can be installed.
Challenges When Mitigating Projects- Drying Behind Walls
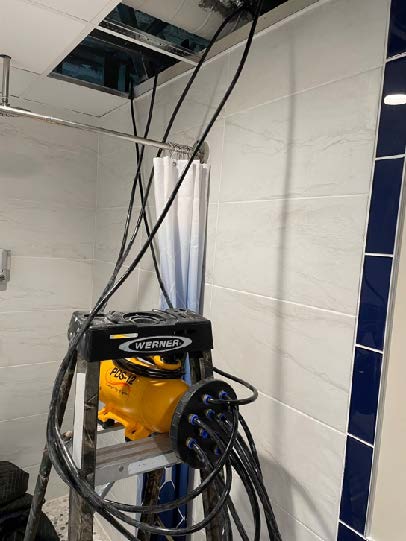


In a commercial setting, the interruption of business operations is usually the primary concern of the occupants and owners. The example given earlier of walls covered by tile are on the one hand represent a drying challenge and on the other represent significant disruption and time for demo and repair. How can you mitigate the interruption, time and cost? Get warm airflow to the water in assemblies to get them dry with minimal demo.
In the example given, getting airflow to the bottom of the wall assembly was the challenge to meet. PEX pipe was run from the top of the wall assembly to the bottom to deliver significant amounts of air to the wet insulation and gypsum from an air injection system. Ambient air conditions were increased to 85ºF. This combination provided the warm, dry air that was generated by dehumidification into the wall assembly where the water was located. The result? Complete drying of the wall assembly with minimal repairs needed.
Already have your IICRC WRT Certification? Get hands-on training with the IICRC ASD Certification here!
Water Mitigation Process- Why Limit Demolition?
Why consider limiting demolition? In addition to added convenience to customers, and saving money for insurers, drying with limited demolition is more profitable. Additionally, less demolition means fewer people needed to complete the work.
Is it accurate to say that limiting demolition is more profitable? In most cases the answer is yes. The additional profit is generated by reducing costly labor and increasing profitable equipment usage. Resist the temptation to look at the lower construction revenue and confuse it with lower profit.
Implementing a New Water Mitigation Process
How do you implement these adjustments to your water mitigation process? The first step is to recognize the importance of the change for your organization. If you don’t feel that the change is necessary, you won’t be motivated to make it. Once you are convinced that reducing demo will increase profitability and reduce the use of your extremely valuable personnel, it’s time to implement practical change.
Clear guidance through written water mitigation processes will help your production and estimating staff to understand exactly what the goal is. Simply saying ‘do less demo’, will have little or no effect on actual operations. Address specific assemblies that your company faces regularly and create step-by-step directions on how to handle them. Then track the implementation of that direction.
Training New Drying Processes
Education is also a critical component. Education should always be an investment.
Unfortunately, it often is not. Whether you select online training or in person hands-on courses, select your training organization based on the quality of that academy, not the convenience of dates or locations. I can’t imagine that is the criteria you would use to select higher education for your children. It shouldn’t be the criteria for drying education for your staff.
Ask yourself, ‘has this academy created a system to teach your staff to dry more effectively, or are they simply filling a gap as a gateway to qualify people to take a certification exam?’ One way to know is to look at Google or Facebook reviews. If one training organization has a higher number of better Google reviews then another, that’s a good indication that your staff is going to receive more valuable training. Importantly, it is also a good indication that you will get a solid return on your investment.
Adapting drying methods to a project or customer is something that a professional restorer does every day. We also need to adapt to a changing work environment. Those changes require more tools in our drying toolbox. Doing less demo and using more equipment is a change that just makes sense.

Nick Sharp
Nick Sharp has worked with Jeremy Reets for nearly 2 decades. He started in carpet cleaning and mitigation before moving to the construction side as a project manager. He then was the senior estimator for Champion Construction for over 8 years. Since its inception in 2015, Nick has been an instructor of our Restoration Estimating & Negotiating course. His most recent venture is as a restoration estimate consultant. Nick is an Xactware Certified Trainer and also has his Levels 1-3 Xactimate Certifications. He’s a bad boy on that sketch but better at finding where you may be losing money!


770-712-7293


